Well with it almost being October I thought I'd start to share some Halloween crafts so when you see my home decorated for Halloween you'll then be able to see how I incorporated the crafts.
So what's coming up?
A topiary made with plastic pumpkins. I'm still working out the exact idea but I've bought 6 of those old fashioned plastic pumpkins we use for trick-or-treating. I'm going to paint them white and black and the faces I'm going to paint with glow in the dark paint. I've got a dowel and I'll drill holes in the pumpkins and stack them. I then plan to put lights in them and this is where I'm torn - how to display! Should I just stick them in the ground or use some sort of urn or planter? I'll figure it out this week.
Also up is dollar store plastic skull heads. My husband has a lot of nuts and bolts and other odd things laying around. I think I'll use hot glue and glue those things to the skull and maybe some glitter....we'll see.
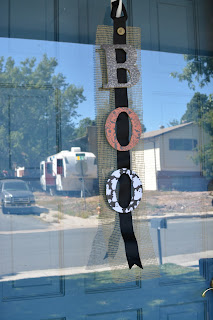
And for today a wooden 'BOO' sign to hang on your door or house.
You will need:
1. Wooden letters. I got mine at Walmart for .69 each. They had 2 sizes the larger was $1.47. You could spell out SPOOKY, HALLOWEEN, GHOST - whatever you want.
2. Craft/scrapbook paper. I got mine at Hobby Lobby and because my letters were small enough I got the 5x5 sheet. I chose 3 different kinds of paper, spider webs, ghosts and witches.
3. Ribbon. I got mine at Walmart and it is just black ribbon - no wire.
4. Something for the background. I used thick wire mesh ribbon but you could use material or even a thicker ribbon.
5. A button or other embelishment- to hide the safety pin
6. Two small safety pins
7. Pencil
8. Hot glue gun and glue sticks
9. Heavy duty stapler with staples
10. Scissors or an exacto knife
11. A paper plate or something to hold your Modge Podge
12. Modge Podge or a mixture of glue and water
13. Paint brush
Step 1. Trace your letters on the back of your paper. IMPORTANT - you want the paper to be right-side up when you glue it to the front of the letter. This is really important if your paper has writing on it, you don't want your writing to be upside down or backwards.
Step 2 - Cut out your letters. I used scissors but if you are good with an exacto knife you can use that. DO NOT cut inside the outline - this is one project where it is okay to go bigger.
Step 3 - Pour some of your modge podge onto your paper plate. You will want to work with the letter itself and paint a VERY thin coat of glue onto the letter using your paintbrush.
Step 4 - Position your letter's matching paper onto the glued side of your letter and press down a bit making sure you don't have large bubbles or gaps. I just used my fingers but you could use the side of a pencil or other tool.
Step 5 - Paint another VERY thin coat of glue over the paper.
Do these steps for each letter.
Let them dry really well. I let mine dry overnight.
Step 6 - You want to position your letters on your ribbon then cut the ribbon to the desired length.
NOTE - I left about 2 inches of ribbon at the top to make the loop for hanging.
TIP - Make a fancy cut at the bottom of your ribbon. I folded the ribbon in half lengthwise then cut an angle to make the fancy bottom cut.
Now you can just use the ribbon, especially if you are using the small letters. I put mine on a background of thick mesh as mine will be used outside.
Step 7 - Now flip your creation over. Make sure it is re-positioned and aligned the way you want it.
Step 8 - Using the heavy duty stapler - staple your letters to the ribbon and your background.
Step 9 - Take the extra ribbon you left at the top and make a loop. Then using your safety pin, pin the ribbon onto itself and through any other background material to make the loop.
Step 10 - OPTIONAL - I then took about an inch long piece of the same ribbon and fished it through the loop hole and pinned it together. This makes a loop the opposite way from the first loop. I thought it would be easier to hang this way.
Step 11 - Using your hot glue gun - glue a button or other embellishment to the top of your sign. You are hiding the pin that made the original loop. You could make a bow or use a Halloween themed embellishment like a skull ring etc. I used a button.
Step 12 - Now hang your sign!
Sorry for the glare - I had just washed my front door glass and the sun was shinning on it making it a crazy glare. You can at least see our lovely neighbors yard... lovely.
Thanks for stopping by!
You can follow me on Pintrest -
https://www.pinterest.com/vicdenniso/
You should really look at my Halloween and Fall boards right now. So many great ideas out there!
I'm also on Facebook -
https://www.facebook.com/Dragonflies-and-Thistles-491393717621010/timeline/?ref=hl
Coming soon!
Instagram!
Please stop by next week to see the topiaries. Hopefully I'll figure out how to display them. They look great in my head so we'll see how it translates to the real world.
Until then, stay safe
Victoria


Such a good idea! Thanks for sharing!!! Can't wait to make this!
ReplyDelete