Monday, October 20, 2014

Multidimensional fall wreath

Today I'm sharing how to make this unique fall wreath.
You will need the following:

1 - 14 inch wreath.  I used straw.
1 - 6 inch wreath.  I got this one at the dollar store
1 - 35 foot roll of ribbon, color of your choosing - for the 14 inch wreath
1 - 15 foot roll of ribbon, color of your choosing for the 6 inch wreath
1 -Roll of ribbon, any length to hang the wreath
Flowers or decorations of your choice
Scissors
Glue gun
6 straight pins
1 - safety pin


Let's get started!

Step 1 - Wrap the smaller wreath using your 15 feet of ribbon.  Begin by gluing the ribbon to the wreath and placing 2 straight pins through the ribbon and the wreath to secure it in place.
Wrap the ribbon, pulling as tight as you can.  When you come back to the beginning, cut your ribbon, spread another bead of glue to the ribbon and use 2 straight pins to hold it in place.

Step 2 - Wrap the larger wreath using your 35 feet of ribbon.  Begin by gluing the ribbon to the wreath and placing 2 straight pins through the ribbon and the wreath to secure it in place.  Wrap the ribbon, pulling as tight as you can.  When you come back to the beginning, cut your ribbon, spread another bead of glue to the ribbon and use 2 straight pins to hold it in place.

 
Embellishing

You can embellish your wreaths any way you want.  I chose some scrapbook flowers and a deer head pendant (I found all of these at Hobby Lobby.  The flowers in the scrapbook section and the deer head in the jewelry section).  Don't limit your options!  You can embellish with anything.  How about a small lantern?  Or a birdhouse?  Let your imagination fly!!!! 

I laid the smaller wreath on top of the larger one then played around with the arrangement of the flowers and things until I got what I liked.  I then glued all the embellishments down.

Securing your wreaths together.
To secure the wreaths together you just need a bit of ribbon.  I wanted a two tone look so I used some mesh ribbon to hold the wreaths close together.  I measured out how much I would need then wrapped the two wreaths together, then glued the ribbon to the wreath.
Last but not least, how to hang your wreath. 
I cut a length of ribbon, wrapped it once around the wreath.  Taking the cut ends and holding the right sides together, fold over a bit of ribbon and safety pinned the ribbon together.


When you flip it back you won't see the raw edges and the ribbon will hold the wreath.
Then hang your creation!


This will bring a 3 dimensionality to your front door for fall. 

Thanks for stopping by.  I hope you've like the crafts I've shared lately. 
Stay safe,
Victoria

Remember, you can always follow me on Pintrest -
http://www.pinterest.com/vicdenniso/

Facebook -
https://www.facebook.com/pages/Dragonflies-and-Thistles/491393717621010

Or right here on the blog.
http://www.dragonfliesandthistles.blogspot.com

Wednesday, October 8, 2014

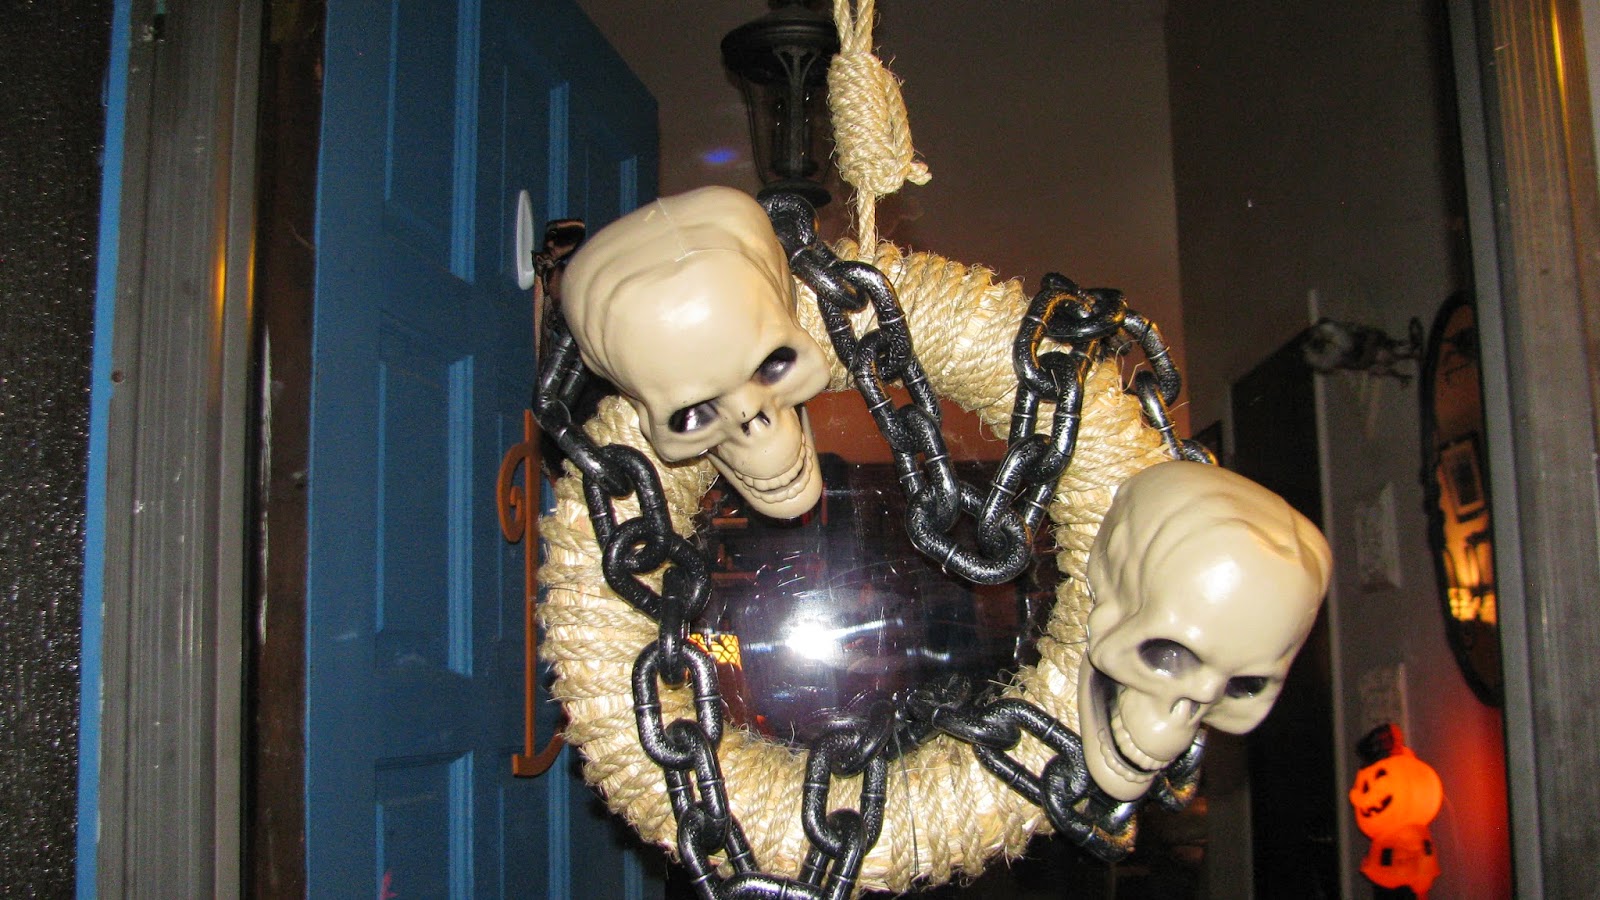
PB Halloween wreath knock off

I found this great wreath for Halloween on Pottery Barn.
Pretty cool huh. 
Well it is a whopping, are you sitting down?  A whopping, $99.00!  CRAZY.  The online description says the skulls are metal as is the chain and real rope... WOW.  Right now it is on sale for the special price of $79.00.

I don't know about any of you but I really don't have even $79.00 to splurge on a door decoration let alone $100.00! 

They are also selling some skulls on a stake.

These were $39.50 EACH.  They are now on sale for $23.50 each, oh plus shipping and handling.
I mean they are skulls on a stick. The skulls are made of 'poly resin'. 
Now I like them and I really love the wreath.  So what's a girl to do? 
MAKE THEM MYSELF! 

Here is what you will need to make the wreath:
1 wreath - I used a 13 inch straw wreath
At least 2 skulls - I got mine at the dollar store
Plastic or rubber chain - I got mine at Walmart
Rope - for a 13 inch wreath you will need 100 feet of rope. 
Glue - I started out using hot glue and ended up using E6000
Wire - to secure the chain and skulls to your wreath
Wire cutters
2 small screws
1 screwdriver
Sharp scissors


Now lets begin.
Step 1 - If you use a straw wreath unwrap the plastic.  Yes it will make a mess.

Step 2 - Decide where you want the top of your wreath to be.  Glue the open end of the rope to the wreath and start wrapping.  I also glued the rope every so many wraps.

Step 3 - Completely wrap your wreath.  This is where I failed a bit.  I only bought 50 feet of jute rope and I needed 100 feet for a 13 inch straw wreath.  So with my husbands help, I unwrapped and re-wrapped. 

Step 4 - As you come back to the beginning of your wrapping you will need to glue the rope down to the wreath again.

Step 5 - Make a noose.  Making a large loop with a large hole at the top and a small hole at the bottom.  Then wrap your rope around the loop.  When you get to the top run your rope end through the large loop and then through the small loop.  Pull the end of the rope to secure the noose. 


Step 6 - Add your skulls.  My husband drilled a screw into the back of each skull, we then wrapped picture hanging wire around the screws, then tightened the screw with a screwdriver.  After deciding where I wanted each skull we then secured them to the wreath by wrapping the picture wire around the wreath and twisting it tightly.  We then cut the end of the wire and pushed it back into the wreath. 


Step 7 - Add your chain - To secure the chain I used E6000 and glued the chain to the wreath. 
Now hang it. 

I think it turned out fantastic AND the best part is that is only cost me about $15.00 and 35 minutes of my time.
Here is the breakdown.
13 inch straw wreath from Hobby Lobby - $4.00
Jute rope from Walmart - $5.50
2 skulls - dollar store - $2.00 total
Plastic chain - Walmart - $5.00

I had the ret of the items on hand.  But even if you needed to buy glue and wire etc. you could still do this wreath for under $25.00.  That is a heck of a lot better than $100.00!!!!
So again, this is the Pottery Barn version

And here is mine:


What do you think?  I love it, love it, love it!! 

You could easily make the skulls on a stake also.  I'd love to see someone's version of those! 

Till next Tuesday - stay safe
Victoria

As always you can follow me on Pintrest -
http://www.pinterest.com/vicdenniso/

And Facebook -
https://www.facebook.com/pages/Dragonflies-and-Thistles/491393717621010

And directly here on the blog! 


Monday, October 6, 2014

Halloween happenings

I love Halloween.  I mean I really love it. I have almost as much Halloween things as I've got Christmas. 
In starting my decorating this year I also realized that I've got a slight pumpkin obsession.  You know I bought some last year after the season when they were on sale, then again this year when they went on sale and now I've got like 50 or so faux pumpkins or ceramic ones. 

My 'pinspiration' this year for my mantle is this.
I also loved what I did last year, you can see that here..
http://www.dragonfliesandthistles.blogspot.com/2013/10/halloween-has-come-to-our-house.html

I moved my dinning and living room back to their original positions early this year.  Here in Colorado we are usually blessed with a warm fall, 70's and some 80's but it could snow at any time.  Many years I sent my husband and the kids out in heavy winter coats and snow boots to Trick-or-Treat. 

I did a bit of a combination of the above pin and my last years mantle for this year.  I really like it.


Here is the rundown. 
Happy Halloween picture is from Kirklands - $16.99
Other framed items are from Google, printed and framed.  All dollar store frames.
Tree branch - my backyard - FREE
Crows- dollar store
Lights - the purple set I got from Walmart - $6.99, the orange is from the dollar store.
Tin sculptures - both from Gordman's, last year.
Faux black pumpkin - Michael's last year on sale 1/2 off $4.99

I also decorated my buffet and instead of the Spooky Town display that I usually put up (the kids felt too old for it this year, sniff, sniff), I displayed almost all of my many pumpkins, (the rest are in a bin on the coffee table).


Run down:
On the buffet - Large and medium light up pumpkins - Target (though I am sure most store's carry them).  I've had them for years, I want to say the large one I got on sale for $10.00 and the smaller one was $5.00.  Always buy at the end of the season for the best savings.
Other lit pumpkins - these I got at Michael's years ago, they are actually for candles but I put a string of dollar store lights in each one. 
Large silver pumpkin - Home Goods, last year on sale, $10.00
All other pumpkins are from Michael's, Gordman's or Home Goods.

When you walk into my house you are greeted by my favorite Halloween item.  I've had it since I was a kid.  It is from the late 60's and he just brings back so many good memories.

I bought this little darling thing at Kirkland's it was a whopping $3.00


It is hanging on my hall entryway closet door.
Here is the entire entry.  This year I didn't put up all the bats like last year, you know you just have to change it up every now and then!  I did get a new entryway rug from Walmart, it is by BH&G and was $22.00.  I also got the galvanized bucket from Walmart, also BH&G for $13.00.

And here is my living room from the front door view.

On Thursday I'll be back with a crazy easy door wreath craft and it is a PB knock off.  I made it for less than $10.00 and the PB version is $60.00!  I'll also have another PB knock off that you could make for less than $5.00 each and they are selling them for $30.00 each!  CRAZY! 
 
 
Until Thursday, be safe,
Victoria
 
As always you can follow me on Pintrest -
 
Facebook -
 
And here directly on the blog at