Monday, March 23, 2015

Boxwood wreath

Spring is here! Spring is here!

It has been really beautiful here in Colorado these last few weeks.  Unseasonably warm, high 60's and even some days with 70 degree weather! 

Unfortunately, I know it won't last.  April is our snowiest month but I've got my fingers crossed! 

This week I made a boxwood wreath.  Let me start with saying if you try this make sure you look for the faux on sale.  I mean really otherwise you are looking to spend $18.00 - $20.00 PER BUSH! 
The wreaths are cheap - they start at $2.00. 

You can do this, I know you can.


Okay lets start.

You will need some faux bushes.  I wanted to make two wreathes so I bought two long dark bushes; one light long bush and one short variegated bush.
I also bought 2 twig wreathes.  You can us any kind but twig is the best. 


You will need wire snips or really sturdy scissors and florist wire. 

Start by deciding which color will be your base. I chose the dark.  Next, using the wire snips, cut a length of the faux boxwood.  Also cut a very small length of florist wire.  Stick the cut end of the boxwood into the twig wreath and secure it tightly with the florist wire.
 Cut another length of boxwood and cut another small piece of wire.  Lift the 'flower' end of the boxwood and stick the new piece of boxwood underneath the first one.  Secure that piece down with small piece of wire. 
Keep going around the wreath with your base.  Next choose your accent color and lay that overtop the base, using the florist wire to secure each piece.
Continue around the wreath.  Every now and then take a step back and look at your wreath and see where you need to fill in. 
I then took a piece of twine and made a loop on the back and hung it over the mirror in my foyer.
I love it!  What do you think? 
It was really easy and I only stuck myself once with the wire. 

Thanks for stopping by.  I really appreciate it! 
Until next week, Stay Safe!
Victoria

You can always follow me on Pintrest -
https://www.pinterest.com/vicdenniso/

I'm on Facebook as well, I do post at least once a week -
https://www.facebook.com/pages/Dragonflies-and-Thistles/491393717621010?ref=hl

You can also follow me right here on the blog -
www.dragonfliesandthistles.BlogSpot.com

Monday, March 16, 2015

Spring door

It is spring or so the March calendar indicates.  Here in Colorado it is still winter, we get most of our snow in April but right now our March has been warm, very warm even balmy.  It was 72 today!  I'll take it because it could snow here tomorrow.  There's a saying in Colorado, 'if you don't like the weather wait an hour, it will change'.  True but I love the weather here, every day it is sunny and though sometimes cold the sunshine helps.  Even in the summer when 90 degrees there is a breeze blowing and without humidity it doesn't feel that hot. 

Today I'm sharing a super cute and easy spring craft I make in less than 30 minutes.  The best part was that it cost me $8.00 to make!  If you have more things on hand yours could be even cheaper!  I think it is super cute.
You will need:
An old frame - you could make one out of wood (I got mine at Hobby Lobby in January for $9.00)
Faux flowers of your choice (I had these on hand)
Ribbon - I also had this on hand
At least 2 packs of small canvas triangles - I got mine at Hobby Lobby
1 pack of string - I used jute twine -  I got at Hobby Lobby
1 pack of small clothes pins - I got mine at Hobby Lobby
Stamps - I had these on hand, you could just hand write each letter with marker


I took the frame I used for my Valentine's Day door décor and removed the heart. 
I then spun the frame upside down so the flowers were on the bottom but you can put your flowers wherever you want.  I didn't want to glue my flowers to the frame since I plan on changing them out for the fall. 
But if you want this permanent you will need to hot glue your faux flowers to the frame.  I think in the corner would look really cute!

Here is a link to the Valentine's Day door -
http://www.dragonfliesandthistles.blogspot.com/2015/01/valentines-day-door.html

This is what the Valentine's Day door looked like -
 
Next using my stamps and a stamp pad I stamped SPRING out on my triangles. One letter on each triangle.  I also stamps a Fleur de Lis and a flower each on their own triangle.

My next step was to cut a length of the jute twine.  Make it longer than the frame and tie it in a knot on each side of the frame.  You are making a sort of clothes line.  Don't worry about the twine itself or the knots; you won't see it all when you are done.  I pulled the twine as tight as I could and made the knots as tight as I could.  I then tucked any extra twine from the ends behind the frame.

Using the small clothes pins hang your word on the line.

I then used a ribbon and tied a knot in one end and looped it around the frame to hand it from the door. 


That is it!  It turned out Super Cute!!!  I love it because it isn't your normal door wreath. 

What do you think? 
Thanks for stopping by!  I'll be back next week, until then - stay safe!
Victoria

You can always follow me on Pintrest -
https://www.pinterest.com/vicdenniso/

I am on Facebook but I only post once a week.  But you can follow me on FB!
https://www.facebook.com/pages/Dragonflies-and-Thistles/491393717621010?ref=hl

You can also get my posts right in your email, just follow me here on the blog -
WWW.Dragonfliesandthistles.blogspot.com

Thanks for your support! 
Happy St. Patrick's Day!  Erin Go Bragh!!! 

Monday, March 9, 2015

Cheese Tray

Have you ever seen a craft and said to yourself... "BRILLIANT!"  or "Why didn't I think of that?" 
This happened to me the other day on Pintrest.  I saw a couple of pins about square tiles being used as trays or to display objects on. 
BRILLIANT!

I am here to tell you that it is an easy and cheap craft, (about $10.00) and something that would make a great gift. 


Here is what you'll need:

1.  A piece of tile, your choosing.  I chose one that is rectangle.  You can choose any kind of floor tile as long as it is one solid piece. 
2.  Handles.  I used regular drawer handles
3.  Glue I used E6000 and a construction epoxy that you mix
4.   Rubber or some sort of feet for the bottom

All of these items I got at Home Depot for about $10.00.  The tile piece is marble and was $1.93.  The rubber feet were 10 in a pack for $1.98.  The two drawer pulls were $2.98 each for $5.96.  I had the glue's on hand. 

Step 1 - Using the E6000 glue your rubber feet to the bottom of your tile.  Since my tile is a rectangle I used 6 feet on the bottom.  The rubber feet did have an adhesive backing but I wasn't sure if it would stick to the tile bottom.


As you can see above my rubber feet weren't flat but around 1/4 inch high.  I wanted my tray to sit off the surface a bit.
Step 2 - Using the epoxy I mixed the glue and used it to glue the handles to the tile, one on each side.
Finally, sit the tray aside and let it dry for at least an hour. 
Now I've got a nice cheese tray and it looked great on my Mother-In-Law's black countertops.


This was a great and inexpensive craft.  I am going to try and find some granite remnants and make one out of granite for a friend for Christmas! 
Thanks for stopping by.  I hope everyone has a great week.  I'll be back next week but until then, STAY SAFE!
Victoria

You can always follow me on Pintrest -
https://www.pinterest.com/vicdenniso/

Facebook -
https://www.facebook.com/pages/Dragonflies-and-Thistles/491393717621010?ref=hl

Or right here on the blog! 
http://www.dragonfliesandthistles.blogspot.com/

Monday, March 2, 2015

Egg fail... sort of

Oh decoupage we have a love/hate relationship.  I love the idea of it, the look of it when it goes right but when it goes wrong, oh my!  Unfortunately for me decoupage seems to go wrong more often than not.  But I try and I continue to try.  I'd appreciate any tips to make it go right. 

Okay so as always I will share the good, the bad and the really ugly.  I'd categorize this as the 'bad'. 

I saw this cute egg craft on Pintrest done with sheet music or a book page and plastic eggs. 

https://www.pinterest.com/pin/193865958936025882/

Here is my version, step by step...

You will need:
Craft eggs, I used plastic eggs
Book pages, sheet music or fabric
Decoupage medium
Plastic bowl
Paint sponge
Glitter
Twine, jute or ribbon


Step 1 - Rip up your book pages, sheet music or fabric into small pieces
Step 2 - Pour your decoupage into the plastic bowl
Step 3 - Soak your ripped paper in the decoupage
Step 4 - Using your paint sponge paint your egg

Step 5 - Take your wet ripped paper and cover your egg

Step 6 - Using your paint sponge cover the egg with decoupage
Step 7 - Take the glitter and sprinkle it over the egg
Step 8 - Let the eggs dry, I used a plastic plate

Step 9 - Tie the ribbon, jute or twine around the egg. 

DISPLAY! 

Options - you could write on the egg or stamp on it instead of or addition to glitter. 

I think playing like I was in Elementary School and painting my hand with the glue turned out better!


Anyway, my eggs turned out eh...

Do you have any tips to make decoupage turn out better?  I'd appreciate any help cause I love the look when it goes well. 
Thanks for stopping by!  I appreciate you reading and visiting.  I'll be back next week!  Until then, stay safe,
Victoria

PS - you can always follow me on Pintrest -
https://www.pinterest.com/vicdenniso/

I'm on Facebook, but due to the nature of FB, not as active.
https://www.facebook.com/pages/Dragonflies-and-Thistles/491393717621010?ref=hl


Monday, February 23, 2015

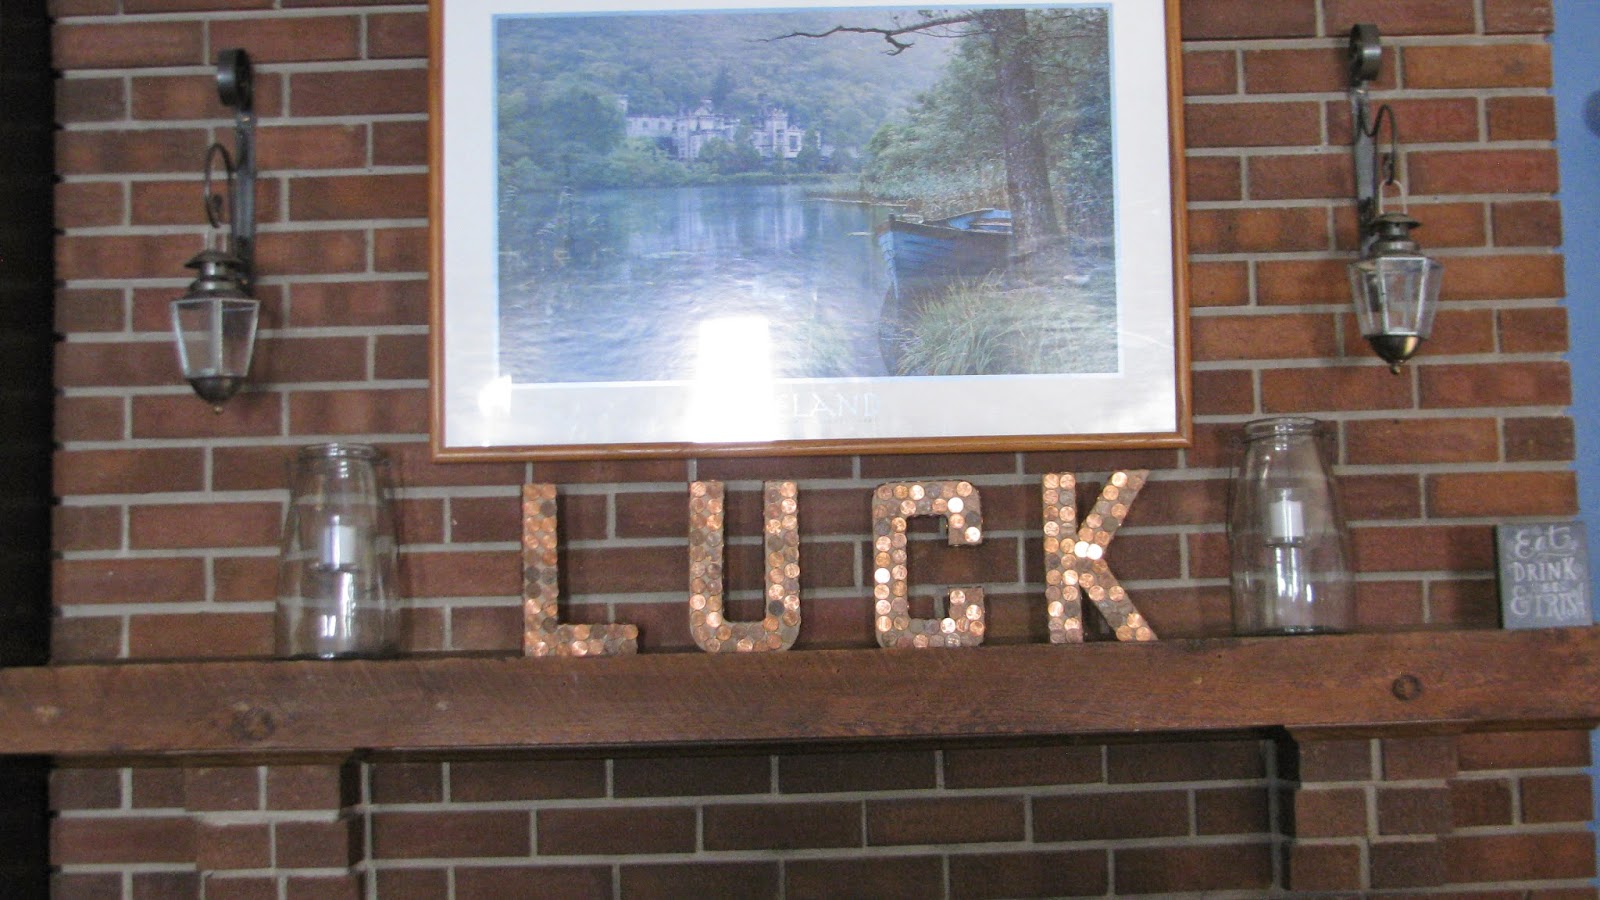
Luck of the Irish

I've always decorated for different holiday's from New Year's to Christmas I decorate for not only the seasons but all the holiday's in between. 

With some of the holiday's the trick is making the décor not look cartoonish or tacky.  Big trick. 

St. Patrick's Day is coming and I am part Irish on my Paternal side so St. Patrick's Day is big for me.  I make my Grandmother's Irish Soda Bread and her Corned Beef and cabbage (I am not a fan of cooked cabbage but my husband loves it).  We always have a big gathering of friends and family and celebrate. 

Contrary to everyone else, I wear blue on St. Patrick's Day not the traditional green.  My Grandmother always said that it is tradition to wear blue, St. Patrick's signature color.  The wearing of the green comes from the Irish who immigrated here remembering the Emerald Isle by wearing green.  In Ireland, St. Patrick's Day is actually a religious holiday and most of the population goes to church then hits the pubs! 

This is a super cute craft and aside from burning my finger with the hot glue it was easy.... EASY! 

Gather your pennies and create this crazy cute craft! 

You will need:
Pennies - I used $2.84 worth of pennies
Letters - 3D letters, I bought at Hobby Lobby (regular price $2.99 each I got them 40% off)
Hot glue gun and glue sticks


Ready for how easy this is.... just glue the pennies to the letters.  I glued to all the surfaces, front, top, sides and inside.  I DID NOT glue pennies to the bottom of the letters.  I did some pennies facing up and some tail side.   

Yep that is it!  I didn't paint the letters or do anything to them before I glued the pennies to them.  The only thing I would caution you on is be careful, a hot glue gun is well HOT!  I burned my finger. 

So super cute! 
It looks great on my mantle for St. Pat's Day doesn't it!? 

Let me know if you try this!

Until next week, be safe!
Victoria

You can always follow me on Pintrest -
https://www.pinterest.com/vicdenniso/

I'm also on Facebook -
https://www.facebook.com/pages/Dragonflies-and-Thistles/491393717621010


Monday, February 9, 2015

Button Craft

I've seen this craft all over Pintrest, usually hearts but with St. Patrick's Day coming I thought why not do a Shamrock instead! 

You'll need:
1 canvas
Lots of buttons - you can choose any colors
Craft Glue - I use craft glue because it dries clear
Scissors
Pen or pencil - for tracing or drawing
Shape of something you want to create - I got a shamrock off the internet, printed and cut it out


First if you used a shape like I did you will need to cut it out.  Otherwise you can draw out your shape with the pen or pencil. 

 
Finally, using your glue and buttons start gluing!  I used some buttons that were flat and some that had stem on the back.  I also layered the buttons to cover any spots where the canvas was showing through. 
 
It took me about an hour from start to finish!
 

CUTE!!
You could do any shape - hearts for Valentine Day; bells or snowflakes for Christmas; Eggs or a cross for Easter; a leaf for the fall; a jack-o-lantern for Halloween, a turkey for Thanksgiving.  Use your imagination! 
You could even be color specific.  I used buttons I had on-hand but you could buy color specific buttons; say orange and black for the Halloween Jack-O-Lantern. 

If you've got lot's of buttons on hand I hope you give this easy craft a try! 

Thanks for stopping by!  Next week I'll be decorating for St. Patrick's Day. 
Victoria

You can always follow me on Pintrest -
https://www.pinterest.com/vicdenniso/

Facebook - I do post here when I've posted a blog
https://www.facebook.com/pages/Dragonflies-and-Thistles/491393717621010

And right here on the blog! 
www.dragonfliesandthistles.blogspot.com

Monday, February 2, 2015

Valentine Day Decor

Valentine Day is one holiday that I don't decorate a lot for.  I mean, how do you decorate for it without it looking cheesy? 

When my kiddo's were little we would make decorations and I still have them, safely tucked away in a storage box.  I opened the box today and found my daughters painstakingly made heart, age 3.  She cut it out herself and colored it, call me a sap but I cried. 

Let me share some of my Valentine décor. 

Last year I made a heart garland, you can find that here.
http://www.dragonfliesandthistles.blogspot.com/2014/02/valentines-day-crafts.html

I put it up again this year, I think it is really cute.

Last year I also made these X , O and heart boxes.
http://www.dragonfliesandthistles.blogspot.com/2014/02/heart-box-with-xs-and-os.html


Along with the LOVE signs.


http://www.dragonfliesandthistles.blogspot.com/2014/01/valentines-day-craft.html


I also showed this cheap and easy craft.
http://www.dragonfliesandthistles.blogspot.com/2014/02/one-easy-and-cheap-craft.html


Here is my mantle this year.
Simple.. I may change it up but for now I like it. 

I shared my front door for this year here - LOVE IT!
http://www.dragonfliesandthistles.blogspot.com/2015/01/valentines-day-door.html

Do you decorate for Valentine Day?  I'd love to see your pictures and hear your ideas. 
Next week I'll share a button Valentine Day craft, until then... be safe!
Victoria

You can follow me on Pintrest -
https://www.pinterest.com/vicdenniso/

Facebook -
https://www.facebook.com/pages/Dragonflies-and-Thistles/491393717621010

And here on the blog!
www.dragonfliesandthistle.blogspot.com