Monday, February 23, 2015

Luck of the Irish

I've always decorated for different holiday's from New Year's to Christmas I decorate for not only the seasons but all the holiday's in between. 

With some of the holiday's the trick is making the décor not look cartoonish or tacky.  Big trick. 

St. Patrick's Day is coming and I am part Irish on my Paternal side so St. Patrick's Day is big for me.  I make my Grandmother's Irish Soda Bread and her Corned Beef and cabbage (I am not a fan of cooked cabbage but my husband loves it).  We always have a big gathering of friends and family and celebrate. 

Contrary to everyone else, I wear blue on St. Patrick's Day not the traditional green.  My Grandmother always said that it is tradition to wear blue, St. Patrick's signature color.  The wearing of the green comes from the Irish who immigrated here remembering the Emerald Isle by wearing green.  In Ireland, St. Patrick's Day is actually a religious holiday and most of the population goes to church then hits the pubs! 

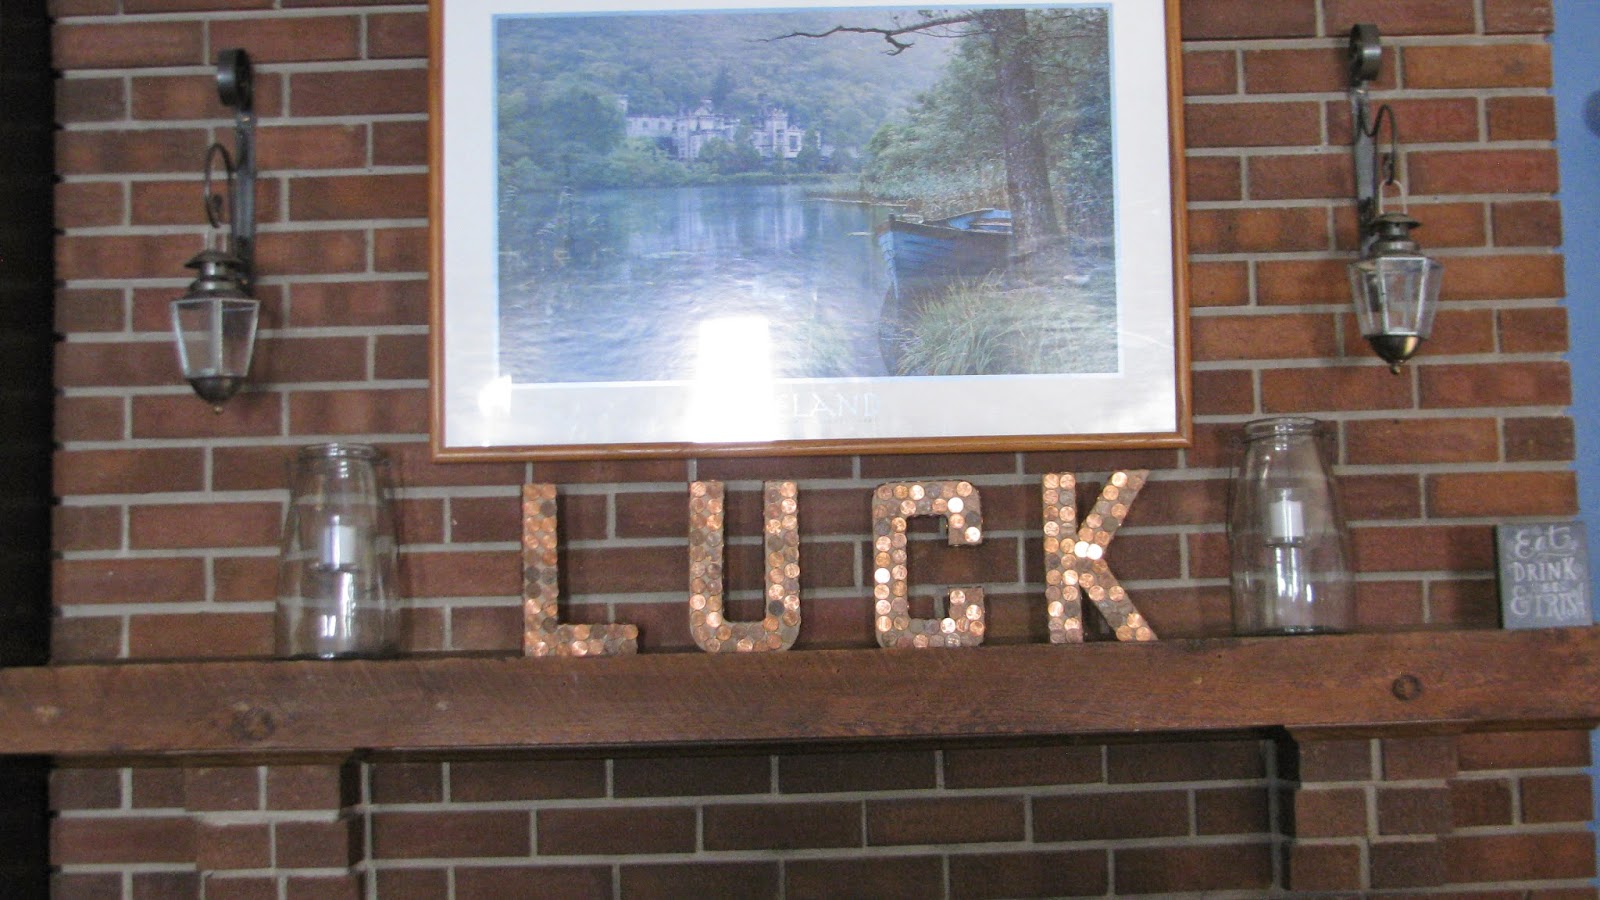
This is a super cute craft and aside from burning my finger with the hot glue it was easy.... EASY! 

Gather your pennies and create this crazy cute craft! 

You will need:
Pennies - I used $2.84 worth of pennies
Letters - 3D letters, I bought at Hobby Lobby (regular price $2.99 each I got them 40% off)
Hot glue gun and glue sticks


Ready for how easy this is.... just glue the pennies to the letters.  I glued to all the surfaces, front, top, sides and inside.  I DID NOT glue pennies to the bottom of the letters.  I did some pennies facing up and some tail side.   

Yep that is it!  I didn't paint the letters or do anything to them before I glued the pennies to them.  The only thing I would caution you on is be careful, a hot glue gun is well HOT!  I burned my finger. 

So super cute! 
It looks great on my mantle for St. Pat's Day doesn't it!? 

Let me know if you try this!

Until next week, be safe!
Victoria

You can always follow me on Pintrest -
https://www.pinterest.com/vicdenniso/

I'm also on Facebook -
https://www.facebook.com/pages/Dragonflies-and-Thistles/491393717621010


Monday, February 9, 2015

Button Craft

I've seen this craft all over Pintrest, usually hearts but with St. Patrick's Day coming I thought why not do a Shamrock instead! 

You'll need:
1 canvas
Lots of buttons - you can choose any colors
Craft Glue - I use craft glue because it dries clear
Scissors
Pen or pencil - for tracing or drawing
Shape of something you want to create - I got a shamrock off the internet, printed and cut it out


First if you used a shape like I did you will need to cut it out.  Otherwise you can draw out your shape with the pen or pencil. 

 
Finally, using your glue and buttons start gluing!  I used some buttons that were flat and some that had stem on the back.  I also layered the buttons to cover any spots where the canvas was showing through. 
 
It took me about an hour from start to finish!
 

CUTE!!
You could do any shape - hearts for Valentine Day; bells or snowflakes for Christmas; Eggs or a cross for Easter; a leaf for the fall; a jack-o-lantern for Halloween, a turkey for Thanksgiving.  Use your imagination! 
You could even be color specific.  I used buttons I had on-hand but you could buy color specific buttons; say orange and black for the Halloween Jack-O-Lantern. 

If you've got lot's of buttons on hand I hope you give this easy craft a try! 

Thanks for stopping by!  Next week I'll be decorating for St. Patrick's Day. 
Victoria

You can always follow me on Pintrest -
https://www.pinterest.com/vicdenniso/

Facebook - I do post here when I've posted a blog
https://www.facebook.com/pages/Dragonflies-and-Thistles/491393717621010

And right here on the blog! 
www.dragonfliesandthistles.blogspot.com

Monday, February 2, 2015

Valentine Day Decor

Valentine Day is one holiday that I don't decorate a lot for.  I mean, how do you decorate for it without it looking cheesy? 

When my kiddo's were little we would make decorations and I still have them, safely tucked away in a storage box.  I opened the box today and found my daughters painstakingly made heart, age 3.  She cut it out herself and colored it, call me a sap but I cried. 

Let me share some of my Valentine décor. 

Last year I made a heart garland, you can find that here.
http://www.dragonfliesandthistles.blogspot.com/2014/02/valentines-day-crafts.html

I put it up again this year, I think it is really cute.

Last year I also made these X , O and heart boxes.
http://www.dragonfliesandthistles.blogspot.com/2014/02/heart-box-with-xs-and-os.html


Along with the LOVE signs.


http://www.dragonfliesandthistles.blogspot.com/2014/01/valentines-day-craft.html


I also showed this cheap and easy craft.
http://www.dragonfliesandthistles.blogspot.com/2014/02/one-easy-and-cheap-craft.html


Here is my mantle this year.
Simple.. I may change it up but for now I like it. 

I shared my front door for this year here - LOVE IT!
http://www.dragonfliesandthistles.blogspot.com/2015/01/valentines-day-door.html

Do you decorate for Valentine Day?  I'd love to see your pictures and hear your ideas. 
Next week I'll share a button Valentine Day craft, until then... be safe!
Victoria

You can follow me on Pintrest -
https://www.pinterest.com/vicdenniso/

Facebook -
https://www.facebook.com/pages/Dragonflies-and-Thistles/491393717621010

And here on the blog!
www.dragonfliesandthistle.blogspot.com

Monday, January 26, 2015

The saga of the shrunken sweater

Todays post was suppose to show the inside of my home, decorated for Valentines Day.  As they say, the best laid plans....

We are re-financing our home and the inspector is coming by this week to appraise our house.  My husband asked that I not have the Valentine Day décor up but do something to show the house off in the best way possible. 

Now, while I agree with his philosophy I had a difficult time coming up with something simple and classy... So I went basic, clean and uncluttered. 

This is what I came up with for our mantle and coffee table.  I will probably remove the runner from the coffee table as I'm not happy with the look.  I do love the mantle though.  I got those glass lanterns at Kirkland's. 
Now to the saga of the shrunken sweater... it all ties in bear with me.

My husband was trying to help me with really cleaning the house, we did walls, baseboards and every light fixture was taken down and cleaned.  We want it to look immaculate when the home appraiser comes.  Luckily it is winter and it is going to be in the 60's all week so when the appraiser walks out on my back deck he will see that we have a magnificent view of the entire front range here in Colorado Springs.  Pikes Peak is directly west of the house and sits picture perfect out my back sliding glass doors.

I will even stage the back deck, clean off the chairs, rugs, pillows etc. and set it up similar to how I set it up for the summer so the appraiser can see how much room we have and how nice our deck is. 

In an effort to help my husband washed clothes for me... see I'm getting to the shrunken sweater finally!  He washed and dried his favorite angora/wool blend sweater in warm water.   Then he dried it.  I think it might fit my teenage daughter now!  My husband is a big guy, 6'4, 175 pounds and the sweater didn't cover his chest!  As my daughter said, 'It's a belly sweater now Mom!'

The poor guy,  he just stood there and looked at the sweater when he pulled it out of the dryer.  He tried it on and came to me looking pitiful and sad.  If he hadn't looked so forlorn I might have laughed for 5-10 minutes because the thing looked that funny on him.  I told him I'd do some research and try to fix it. 

I really had no idea what I've gotten myself into here.. how do you fix a shrunken sweater?  Can you fix a shrunken sweater?  I did an online search and found a blog post and several Pins on the subject, (I re-pinned them so check out my cleaning board).  I figured, why not, I couldn't make the thing any worse..... right?  Right? 

So, here is what I did with the sweater. 
Step 1 - Fill the bathtub with cold water
Step 2 - Pour conditioner in the tub and try to dissolve it... tricky in the cold water
Step 3 - Place shrunken sweater in the tub and soak it for an hour
Step 4 - Every 10 minutes I would come in and stretch it, just by pulling on it.  I did the front, then turned the sweater over and did the back. 
*** I swear it looks longer now....
Step 5 - After an hour I squeezed as much water as I could out of the sweater and rolled it in a large bath towel.  I kept stretching it as I went.
Step 6 - Let the water out of the tub, clean the tub
Step 7 - Let the sweater dry rolled in the towel. 

So here is the sweater as it started out.


 This is the conditioner I used and I used 1/2 the bottle!  Per the Pins I used the conditioner relaxes the fibers in the material and thus allowing you to stretch it back to its normal size. 


This is the sweater after 30 minutes and me stretching it... it does look longer don't you think?


This is the sweater after and hour and me stretching it.  I swear it is longer!


This is the sweater rolled in the towel.
 It is still drying... long process.  The Pin said the reason you roll it is to keep its shape and not allow the fibers to shrink back again while drying.  Makes sense.
Now it just has to dry.... I'll let you know how it turns out, I mean I can't make it worse, right?

Thanks so much for stopping by today!  I appreciate you reading.  Stop back next week, I promise I'll be decorated for Valentines Day.  AND I'll share if this worked or not and if we now have an 'un-shrunken' sweater!
Until then,
Stay Safe!
Victoria

You can follow me on Pintrest -
http://www.pinterest.com/vicdenniso/

Facebook -
https://www.facebook.com/pages/Dragonflies-and-Thistles/491393717621010

And right here on the blog!
http://www.dragonfliesandthistles.blogspot.com

Monday, January 19, 2015

Country Pork Ribs... what are those?

Like you I am a busy Mom; what with kids, a husband, two dogs a full time job (40+ hours a week outside the home), blogging and hobbies, heck anything that helps me save time, money and gets my family to eat a good dinner - COUNT ME IN!

I have a picky eater as I am sure many of you do.  One way I get her to try things is by making a weekly meal plan.  Everyone gets input and everyone gets to make up at least 1 dinner a week.  I find if she not only helps me cook but has input into what we are eating she will not only try other foods during the week but she is excited for her dinner to come up. 

Making a meal plan helps me plan and stay organized as well.  I don't have the, 'what do you want for dinner?' or the 'Mom, what's for dinner?' conversations at my house.  The weekly meal plan is posted on the refrigerator so everyone knows. 

This week I'm sharing a recipe for a cheap and easy meal, fix it and forget it!  My kind of deal!
This is one of our favorite meals and I hope you try it and like it. 

Have you ever tried Country Pork Ribs?  They are meatier, cheaper and usually taste better than regular pork ribs.  Heck, you had me a cheaper! 
I got 8 in a package for $10.00, well, $9.67 - I am rounding.  I split them into 2 packages and froze them, pork freezes really well.

To make this you'll need:
Country Pork Ribs
Lawry's Season Salt
Liquid Smoke
Non Stick Spray
Aluminum Foil
Cookie sheet

Start by pre-heating the oven to 250, yes, 250. 
Cover your cookie sheet with aluminum foil and spray with your non stick spray. 
Next, place your country ribs on the cookie sheet.
Aren't they beautiful! 
Now, cover them with the Lawry's Season Salt - both sides.  Don't skimp!  Trust me they won't taste salty.
Then pour your liquid smoke over the ribs.  Have you ever used liquid smoke? It is amazing!
It comes in many flavors, I used Hickory.
Give your ribs a good dousing of the liquid smoke.
Now the tricky part..... pull out a length of aluminum foil that will fit over your cookie sheet.  You need to spray the foil that will come into contact with the ribs.  Then cover them up making sure you wrap the foil so no air escapes. 
These little babies are going to steam themselves into deliciousness.
Put the cookie sheet in the oven and walk away for at least 6 hours. 

In the past I have cooked these the day before, then let them sit to cool, covered them with BBQ sauce, covered them back up with the foil and put them in the refrigerator overnight.  This allows the BBQ sauce to gel and soak into the ribs.  The next day take them out and just warm them over the grill - seriously good stuff here!  AND the BBQ sauce won't drip all over everything, instead the BBQ sauce will stay on the ribs. 

At hour 4 I start making my sides for this dinner.  We usually have baked beans with the ribs and some sort of potato.  Let me share an easy potato recipe.

Even while the ribs are still in the oven, increase the temperature to 350

You will need:
5 or 6 potatoes - depending on how many people you have.  We have 4 in our family and 5 potatoes are plenty with leftovers.  I use russet for this recipe as they stand up a bit better.
A slicer or something to cut the potatoes with.  I've got a mandolin.
A potato peeler - optional - my family doesn't like russet potato skins.
A casserole dish
Non stick spray
Salt
Pepper
Butter - I use 2 tablespoons
1/4 onion
2 tsp. garlic powder
Milk


Wash and peel your potatoes.  Spray your casserole dish with non stick spray.
Cut your onion up into small pieces - again I have a picky eater, doesn't like onion, so I use a chopper and really make them small... shhh don't tell her there's onion in one of her favorite dishes! 
Next, slice your potatoes.  Try to make them as even as possible so they will cook evenly.


Now assemble. 
A layer of potatoes, a bit of onion, a little salt and pepper and a little garlic powder. 
Next a layer of potatoes, a bit of onion, a little salt and pepper and a little garlic powder.
Keep going until you are out of ingredients.

 Finally, top with butter and add the milk.  The milk should come up 1/2 way in the dish.  Cover with a lid or aluminum foil.  Place in the oven and bake for an hour. 

For this potato dish I've tried several other ingredients that are also good.  It is good as I've indicated here but try other things.  I've added shredded cheese, used evaporated and or condensed milk instead of regular milk. I've added a package of dry ranch dressing, dry Italian dressing, bacon, croutons or Panko bread crumbs and other spices.  This basically comes out like a big baked potato so think of things you'd put on a baked potato and you can add it!  Some I've added with 5 - 10 minutes left on the cooking like Sour Cream and even cheese. 
This is pretty easy and my kiddo's eat it up, even the picky one!  But shhh don't tell her there's onion in it!!

After 6 hours in the oven this is what the ribs look like....
Moist, juicy and tender, falling apart when I put them on the plates.  I added BBQ sauce to the middle two in the last 10 minutes of cooking. 

This is what the potatoes look like after an hour or so... depending on how many you make, they are done when you can stick a fork in them easily.

I like easy meals that I can fix and forget.  I hope you try these.  Let me know if you do and how you like them!

Do you have any ideas on how to get a picky eater to eat?  To try different or new things?  I'd love to hear them. 

Thanks for stopping by.  Next week I'll be sharing my house decorated for Valentines Day.  I hope you come back.
Until then, stay safe!
Victoria

You can always follow me on Pintrest -
http://www.pinterest.com/vicdenniso/

I'm also on Facebook, but not as active as I am on Pintrest -
https://www.facebook.com/pages/Dragonflies-and-Thistles/491393717621010

And you can follow me here on the blog!
http://www.dragonfliesandthistles.blogspot.com/
Monday, January 12, 2015

Valentine's Day door

Valentine's Day is coming are you ready? 

 Valentine's Day is one of my favorite holiday's, when else can you celebrate the life of a 3rd century Roman Saint who married soldiers heading for war and for his disobedience he was beheaded??  Gotta love, love! 

But really Valentine's Day is one of my favorite holidays.  Even when my kiddo's were little I made sure to make the day special for my husband and myself.  I would set up a small table in front of our fireplace, make a special dinner, (usually steak and shrimp) feed the kiddo's early and occupy them with a movie while my husband and I sat eating by firelight.  We would even get dressed up for the occasion.  It could be very romantic. 

I decorate the house but I don't use the 'normal' or expected Valentine colors of red, pink and white.  Now I do have some of that in the house but I keep to the colors of my house, grey, blue, black and brown. 

Recently I made a 'wreath' for my front door that has a Valentine theme. 

I love it.  LOVE IT, LOVE IT, LOVE IT!

I got the frame at Hobby Lobby on the clearance rack for $10.00.
The heart also came from HL it was not on sale, $4.00 but you always have the 40% off coupon on-line or on your phone. 
I also got the flowers at HL for 50% off. 
The ribbon I had on hand. 

I cut the flowers off the stems to make them short then hot glued them to the heart.
For the picture frame I didn't want to glue them to the frame so I can change them out for summer or fall if I want to. 

I laid them out on the frame then secured them with a piece of burlap that I glued to the back of the frame.


To hang the heart evenly I strung a wire through the top of the heart and wrapped the ribbon around that.
I like this because it isn't an ordinary wreath. 

Thanks for stopping by!  I appreciate your support.
Let me know what you think of the 'wreath'.  Next week I'll be back and sharing a really easy date night meal.  Until then, stay safe!

Victoria

You can also follow me on Pintrest -
http://www.pinterest.com/vicdenniso/

Facebook -
https://www.facebook.com/pages/Dragonflies-and-Thistles/491393717621010

You can also follow me right here on the blog -
www.dragonfliesandthistles.blogspot.com

Monday, January 5, 2015

Help me organize my closets PLEASE!

January 2015... how did we get here so quickly? 

After the holiday season everyone has the need to purge, plan and organize; I wish I had sage words of wisdom for you or even real help but when my own closets look like this -


How can I offer help to anyone when my own closets are a nightmare!
As you can see I have tried, or attempted to organize things using clear boxes.  I like using the clear boxes so you can see what is inside otherwise each time you will need to open the box to see what is inside. 
I live in a small house, built in 1972, so although I have a lot of closets they are all small.  Take my master bedroom closet, it is only 8 feet long.  To 'help' us organize we put in a closet organizing system.  It helps otherwise I don't think I'd be able to find anything!
The middle section is for folded items such as sweaters, pants and shirts.
Then on each side we have rails to hang clothes on. 
Do you have tips for organization?  I'd love to hear them as I obviously need help! 
I'll be back next week with a Valentine's Day craft until then, be safe!
Victoria

You can always follow me on Pintrest
http://www.pinterest.com/vicdenniso/

Facebook -
https://www.facebook.com/pages/Dragonflies-and-Thistles/491393717621010

Or right here on the blog! 
www.dragonfliesandthistles.blogspot.com

Lot's of snow here in Colorado - do you have snow where you live?